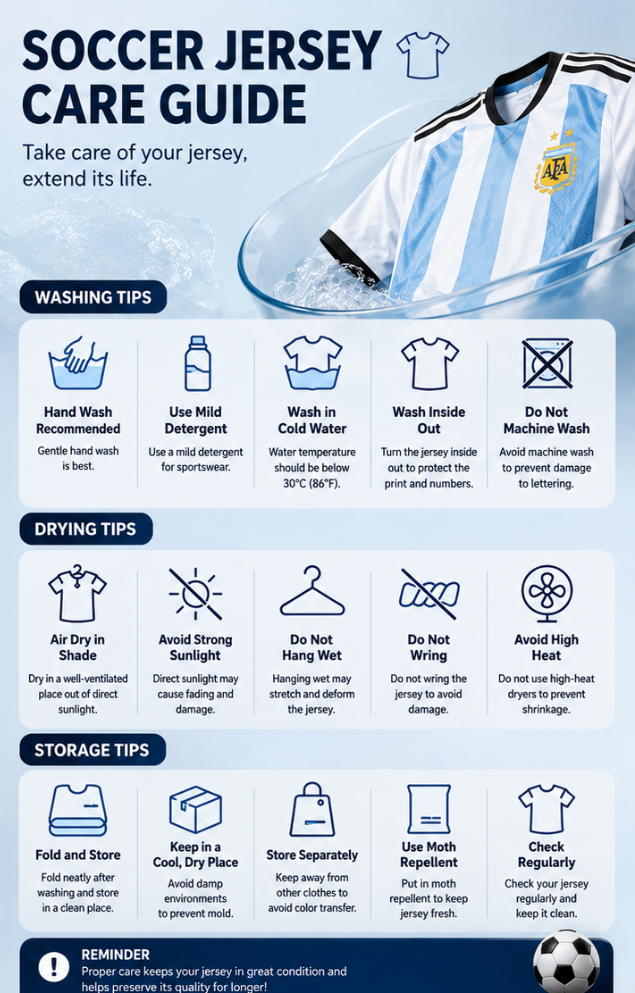
Peeling names, numbers, sponsor logos, or badges are among the most common problems soccer jersey owners face. Whether you own an authentic match jersey, a fan version, or a custom team kit, heat-transferred graphics can eventually begin to lift, crack, or fall off.
After analyzing the key information from leading articles ranking for keywords like “how to stop soccer jersey print peeling,” “football shirt heat press care,” and “repair peeling jersey numbers,” we’ve compiled this complete guide covering the causes, DIY repair methods, daily care, and professional heat press settings.
Why Does Soccer Jersey Printing Peel? Five Common Causes
Most peeling problems are caused by one or more of the following factors:
1. Excessive Fabric Softener or Silicone Residue
Using too much fabric softener during washing leaves a coating on the fabric that weakens the bond between the heat-transfer adhesive and the jersey.
2. Fabric Texture
Many soccer jerseys use breathable mesh polyester. Because mesh fabrics have tiny holes and uneven surfaces, the printed graphics have less contact area with the fabric, reducing long-term adhesion.
3. Repeated Heat Exposure
Tumble dryers, high-temperature ironing, and repeated heat can gradually weaken the adhesive layer used to attach names, numbers, and sponsor logos.
4. Improper Washing
Scrubbing directly over printed areas, washing jerseys right-side out, or using aggressive wash cycles causes unnecessary friction that accelerates peeling and cracking.
5. Physical Wear and Tear
Stretching, sliding tackles, pulling during matches, and repeated movement naturally stress the printed graphics over time.
It’s important to understand that jersey names and numbers are usually heat-transferred vinyl or plastic films applied to the surface, not dyed into the fabric itself. Because they’re surface-applied, they’re naturally more vulnerable than woven or printed textiles.
How to Repair Peeling Soccer Jersey Prints (DIY Guide)
Most professional repair guides recommend nearly the same process.
Step 1: Apply Fabric Glue
Carefully lift the peeling edge and apply a small amount of high-quality fabric glue underneath the lifted area. If an entire number or letter has detached, you can often glue it back into its original position.
Step 2: Protect the Graphic
Place a clean cotton cloth over the print before applying heat. Avoid using paper or cardboard, as they can scorch or provide uneven protection.
Step 3: Iron on Low Heat (No Steam)
Set your iron to a low temperature and turn the steam function off. Press gently over the protected area for approximately 30 seconds.
Step 4: Let It Cure
Lay the jersey flat for at least 24 hours so the adhesive can fully cure before wearing or washing it again.
Step 5: Minor Edge Lifting
If only the edges are beginning to lift, gentle reheating with a warm iron is often enough to reactivate the adhesive without needing additional glue.
Step 6: When DIY Isn’t Enough
If large areas are cracked, missing, or badly damaged—especially screen-printed or DTF graphics—the best solution is professional restoration. Repair shops typically remove the old print completely, cut a replacement graphic, reposition it, and apply it using a commercial heat press.
Daily Care Tips to Prevent Jersey Print Peeling
Proper care has a greater impact on print longevity than repair techniques.
Wash Inside Out
Turning your jersey inside out minimizes friction between the printed graphics and other clothing.
Separate Dark and Light Colors
Bright jerseys can bleed color during washing, especially when new.
Use Cold Water
Cold water protects both the fabric and the adhesive. Hot water softens the glue and increases the risk of peeling.
Never Use a Tumble Dryer
High heat is one of the biggest enemies of heat-transferred graphics. Air drying is always the safest option.
Air Dry Naturally
Hang the jersey or lay it flat to dry in a shaded, well-ventilated area. Avoid prolonged exposure to direct sunlight.
Iron Carefully
If ironing is necessary, always turn the jersey inside out and use low heat. Never iron directly on names, numbers, badges, or sponsor logos.
Store Properly
Store jerseys in a cool, dry place away from excessive heat and humidity. Folding is generally preferable to hanging for long-term storage, as hanging may stretch the fabric. Garment bags with silica gel packets can help control moisture, while sealed plastic bags should be avoided because they trap humidity.
Authentic vs. Replica Jerseys
Authentic match jerseys often feature premium heat-pressed badges and lightweight performance fabrics, making hand washing the safest choice. Replica jerseys are generally more durable but should still be washed using gentle, low-temperature settings.
Heat Press Settings for Jersey Printing Professionals
If you’re customizing jerseys or running a printing business, proper heat press settings are critical.
Typical Heat Transfer Vinyl (HTV)
For materials such as Siser EasyWeed, common settings include:
- Temperature: approximately 305°F (152°C)
- Initial press: about 3 seconds
- Final press: about 10 seconds
- Peel method: Hot Peel
Always follow the manufacturer’s specifications, as different materials require different settings.
Pressure
Most manufacturers recommend using approximately 50–60% medium pressure to achieve consistent bonding.
Mesh Jerseys
Place a heat-resistant pad or protective sheet inside the jersey to prevent adhesive from penetrating through the mesh and sticking the front and back layers together.
Polyester Jerseys
Choose low-temperature transfer materials whenever possible. Polyester is prone to dye migration, where sublimation dyes move into the transfer film during heating, causing white graphics to appear pink or discolored.
Print Method Comparison
Professional printers generally agree that DTF (Direct-to-Film) and screen printing provide better long-term durability than low-quality heat transfer vinyl. High-quality materials combined with proper curing procedures significantly reduce cracking and peeling after repeated washing.
Quick Reference: How to Protect Soccer Jersey Prints
| Situation | Best Practice |
|---|---|
| Washing | Turn inside out, use cold water, separate colors, avoid harsh detergents |
| Drying | Air dry naturally, never tumble dry |
| Ironing | Iron inside out on low heat, avoid direct contact with prints |
| Repair | Fabric glue + cotton cloth + low-heat ironing for 30 seconds + cure for 24 hours |
| Storage | Store in a cool, dry place, fold instead of hanging, use silica gel if needed |
| Custom Printing | Around 305°F (152°C), medium pressure (50–60%), use quality DTF or screen printing |
Final Thoughts
The lifespan of a soccer jersey’s printed graphics depends largely on how you care for it. Roughly 70% of durability comes from proper washing, drying, and storage, while the remaining 30% depends on the quality of the printing materials and manufacturing process.
By following the care tips above, you can significantly extend the life of your jersey’s names, numbers, sponsor logos, and badges. And if peeling has already started, don’t rush to replace your favorite shirt—many minor issues can be successfully repaired at home using quality fabric glue and a household iron.